
MTB geometries explained
Stack and reach are among the most important values in MTB geometry. They play a decisive role in how your mountain bike handles on the trail. SIMPLON explains stack, reach, top tube length, head angle and more – simple and easy to understand. That way, you’ll quickly find the bike that’s perfect for you!
Everything you need to know about stack, reach and more
Reach – what? Stack – how? Top tube length – why? If you’re thinking about buying a new bike, you’ll quickly be bombarded with terminology that can be a little overwhelming. But on the way to your dream bike, there’s one important step: finding the bike geometry that suits you. Because that’s the deciding factor in how your bike feels when you’re riding it.
Questions like “Does this MTB suit my riding style? Which frame size is best? What role do stack and reach play?” should be addressed beforehand.
We’ll show you the most important MTB geometries and explain why they are relevant and what to keep in mind when buying a new bike.
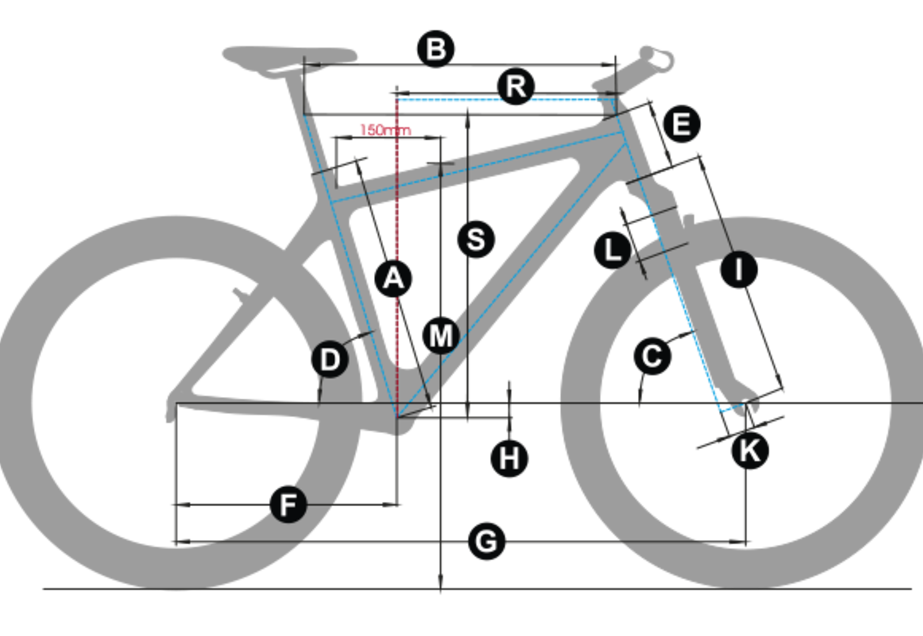
(A) Seat tube length
Seat tube length is measured from the centre of the bottom bracket to the top of the seat tube. It used to be an important reference measure for the size of the frame. For MTBs, it’s now less important because of the dropper Vario seatposts that are frequently integrated as a standard feature. Saddle height is primarily adjusted via the seatpost. For a particularly low sitting position on challenging technical descents, the seat tube is often as short as possible on an MTB. By the way: Because of that, riders can opt for a bigger frame to get an even longer reach.
Rule of thumb for saddle height: The inseam (measured from crotch to ground) is multiplied by 0.885.
Good to know: If you subtract the seat tube length from the saddle height, you’ll know how long the Vario seatpost can or must be at maximum insertion and extension. The height of the saddle is at approximately 40 mm.
(B) Horizontal top tube length
Whether your riding position on the bike is “extended” or “compact” is determined by the top tube length. It’s an important measure for estimating the approximate sitting position and thus riding comfort. It is measured in the imagined horizontal from the top tube / head tube junction to the centre axis of the seat tube.
(C) Steering angle
The head angle, also called steering (axis) angle, is paramount for the manoeuvrability and rolling smoothness of the bike in rough terrain. Rule of thumb: The slacker the angle, the safer and the smoother the bike acts. If you prefer agile and direct handling, you might want to opt for a bike with a steeper angle.
Both options have their pitfalls: While extremely steep angles make the riding experience slightly “bumpier” due to the low caster, they also make the bike respond to steering impulses much quicker. Very slack angles – below 64.5 degrees – might feel “strange” and give you an unusual riding behaviour at low speeds. They also require you to lean forward even more to go over the front wheel.
The steering angle strongly depends on which bike you’re riding – enduro, all mountain, cross-country or trekking. Just get an expert to help you and test it!
(D) Seat angle
Steep mountain passages are your forte? Then you might need a steeper seat angle on your mountain bike. Because: The steeper the seat angle, the more your centre of gravity shifts forward and the more ergonomic the power transfer. This makes riding uphill a piece of cake.
A slack seat angle means there’s more weight on the rear wheel. The crux: The front wheel might start to wander or lift off the ground on steep passages. This makes riding uphill harder. On flat terrain, however, you’ll have a much more relaxed riding experience, and there will be less pressure on your hands.
(E) Head tube length
Head tube length is measured from the bottom to the top of the head tube and tells you more about the height of the front – the so-called stack. Generally speaking: The longer the head tube, the more upright your position on the bike. The shorter it is, the more “extended” you are.
Tip: Mountain bikers who prefer to sit more upright should get an MTB with a longer head tube. However, if you’d like to get more pressure onto the front, you should opt for a short head tube.
(F) Chainstay length
Chainstay length is defined as the length from the centre of the bottom bracket to the centre of the rear dropout. Similar to the head angle, the bike’s smooth riding behaviour (long chainstays) is in juxtaposition with its agility (short chainstays).
Longer chainstays are ideal for those who appreciate a good climbing performance and a smooth rolling behaviour – for example, trekking riders or enduro racers. More playful bike enthusiasts usually prefer shorter chainstays. Doing wheelies or riding over obstacles becomes easier that way.
There are subtle differences between MTBs and E-MTBs, especially when it comes to chainstay length: With e-mountain bikes you can tackle steeper and technically more challenging climbs. To prevent the front wheel from lifting off the ground, longer chainstays are better.
(G) Wheelbase length
Wheelbase length is the distance between the axles of the front and rear wheel. How does that affect handling? A short wheelbase length equals more agility, a longer wheelbase length more running smoothness.
(H) Bottom bracket drop
The advantage of a greater bottom bracket drop is a lower centre of gravity and thus more agile riding behaviour in curves. The drawback: It only allows for less intense cornering because the pedal hits the ground much faster on technical descents with roots and rocks.
(M) Standover height
Another aspect of the bike geometry that needs explaining: standover height. It’s measured vertically from the centre of the bottom bracket to 150 mm from the top tube / seat tube junction. The measurement tells you how much freedom of movement there is between rider and bike. That’s especially relevant when getting off the bike.
Important: A bike with too much standover height can lead to painful bottom-outs and falls. The reason for that is that you can’t get your feet on the ground fast enough when dismounting.
Good to know: There’s no universal standard for measuring standover height. This makes it hard to compare the values of bikes produced by different manufacturers.
(R) Reach and (S) Stack
Translated, reach means “length” and stack means “height.” Both values are among the most important indicators of MTB geometry and help you determine your ideal riding position on a mountain bike.
What is reach?
Reach indicates how long the main frame is. It describes the horizontal distance from the bottom bracket to the top center of the head tube. A longer reach gives you more stability and a stretched-out riding position, while a shorter reach makes the bike more agile and playful.
What is stack?
Stack shows how tall the frame is – in other words, how high the front end sits in relation to the bottom bracket. It is measured vertically from the bottom bracket to the top of the head tube. A higher stack results in a more upright and comfortable position, while a lower stack puts more pressure on the front end for a sportier ride.
Good to know: Stack and reach are now the global standard for comparing mountain bike geometries across different brands. If you want to choose the right frame size, always check stack and reach – they are much more meaningful than top tube or seat tube length alone.
Modern MTB geometry - for more control and riding fun!
SIMPLON uses progressive geometry for the latest MTB models, which ensures optimum riding characteristics:
Longer reach - more stability
A longer reach ensures a larger wheelbase - this makes the bike smoother and more stable. At the same time, a shorter stem is installed to keep the handling agile. The central position improves balance and gives you more freedom of movement on the handlebars. The interplay between the front centre and chainstay length remains important, as it has a decisive influence on handling.
Slacker head angle - smoother handling
A slacker steering angle provides smoother handling and control, especially at high speeds and on steep descents. The front wheel is further forwards, which reduces the risk of a rollover and makes handling more predictable.
Steeper seat angle - more power on the mountain
The steeper seat angle ensures that you have an optimum riding position despite the longer reach. This means more efficiency when pedalling and better power transfer - perfect for long climbs.
With this modern geometry, you get a mountain bike that excels in any terrain - whether uphill, downhill or fast trails!
Good to know: On steep terrain, the seat angle flattens out anyway, as the rear suspension compresses beyond the sag. It therefore makes sense to make the seat angle steeper on mountain bikes than on road bikes or trecking bikes, for example.
If you understand stack and reach, you can compare MTB geometries more easily and find the perfect mountain bike for you faster. And if you prefer travelling with electric assistance, you can also take a closer look at our e-mountainbikes. Or would you prefer a gravel bike?

